Screenshot Workflow with Hazel
Hazel is a all-purpose file moving tool for the Mac. It can move and rename files based on rules for a given folder. But it can do a lot more.
This is how I use Hazel to manage my screenshot workflow. I don’t like a bunch of files littering the desktop. This action sweeps them up and renames and resizes them for me.
Folder setup
Mac OS X saves all new screenshots to the Desktop. I don’t know why this can’t be changed. I would like them moved into my screenshots folder. This rule makes it easy.
Start by creating a new rule for the Desktop folder.
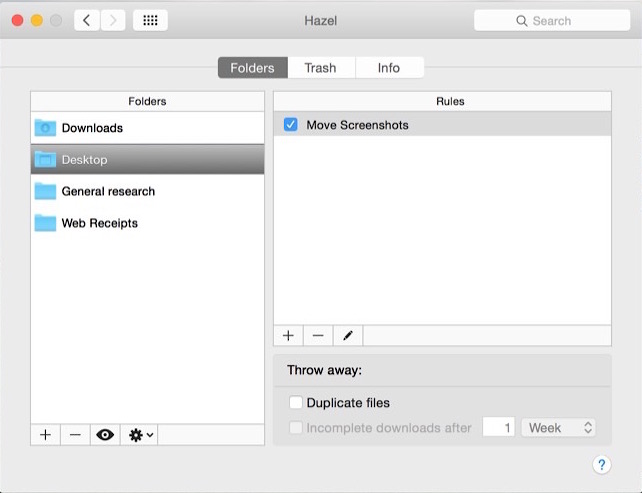
Rule overview
By only matching image files that start with the words “Screen Shot” I can be sure other images saved to the Desktop won’t get moved.
This rule actions do several things:
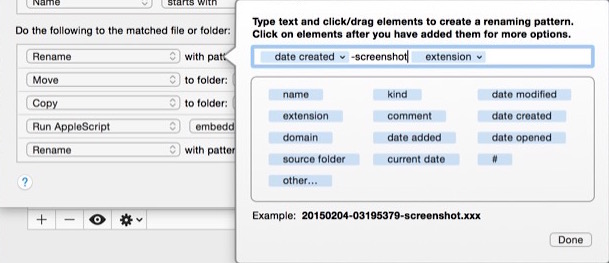
- Rename the image to
datetime-screenshot - Moves it from the Desktop to a folder named
Originalsinside my~/Pictures/Screenshotsfolder. - Creates a copy which is moved into the
Resizedinside my~/Pictures/Screenshotsfolder. - Runs an AppleScript on the copy that resizes it and converts it to JPEG.
- Renames the copy to append
-smto the file name and convert the extension from.pngto.jpg.

Rule Details
There’s nothing special about the file renaming. This is what Hazel excels at. I use the creation date plus the time with -screenshot appended. You can see the example in the line at the bottom.
The heavy lifting the rule comes from the embedded AppleScript. Here the file is checked for orientation. If it’s a landscape image over 650 pixel wide, it will get scaled down to 650. This is because I don’t want images upscaled.
Portrait images are scaled to 450 pixels tall. This way they display better in the blog layout. This is something that might get fine tuned as I use the rule more. It’s also the main reason for keeping the originals around. I can go back and resize them manually if needed.
The script then saves it as JPEG with medium compression into the original file on disk.
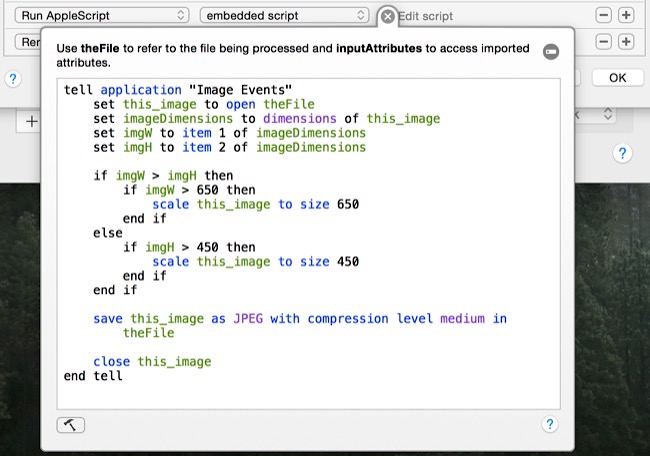
Here’s the AppleScript so you can copy and paste it:
tell application "Image Events"
    set this_image to open theFile
    set imageDimensions to dimensions of this_image
    set imgW to item 1 of imageDimensions
    set imgH to item 2 of imageDimensions

    if imgW > imgH then
        if imgW > 650 then
            scale this_image to size 650
        end if
    else
        if imgH > 450 then
            scale this_image to size 450
        end if
    end if

    save this_image as JPEG with compression level medium in theFile

    close this_image
end tell
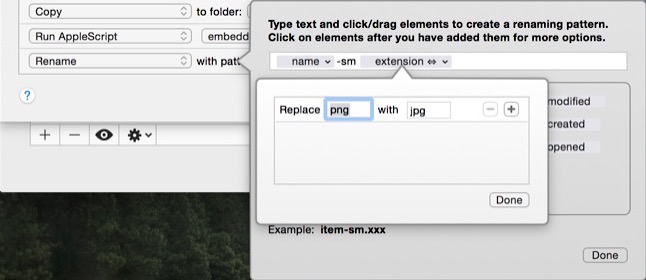
The final step is to append -sm name and make the file extension match the the new JPEG file type.
Now the screenshots are ready for upload. If they didn’t turn out as expected, you have the originals. Just be sure to delete them every so often. They can take up a lot of space.
Test it by taking a screenshot of your Desktop using ⌘-⇧-3. The file should show up on the Desktop for a second before it’s whisked away.
Enjoy!